Closed Batch
After performing a transaction, the transaction will appear in Open Batch. After settlement, the transaction is moved to Closed Batch and grouped by settlement date.
Closed Batch is located within the Reporting section on Selfcare. Below are the functionalities available in Closed Batch:
- View closed batches by date on a single terminal or on all merchant’s terminals that the user has access.
- View and perform operations (subscriptions, refunds, etc.) for transactions within a closed batch.
- Export all transactions for a closed batch to a CSV file.
- View total volume and amount of transactions within a batch and in different periods (day, week, month)
- Search transactions in multiple closed batches and in different terminals.
- View transaction details.
- Refund settled transactions.
- Resend cardholder receipts.
- Print merchant and cardholder receipts.
Batches Tab
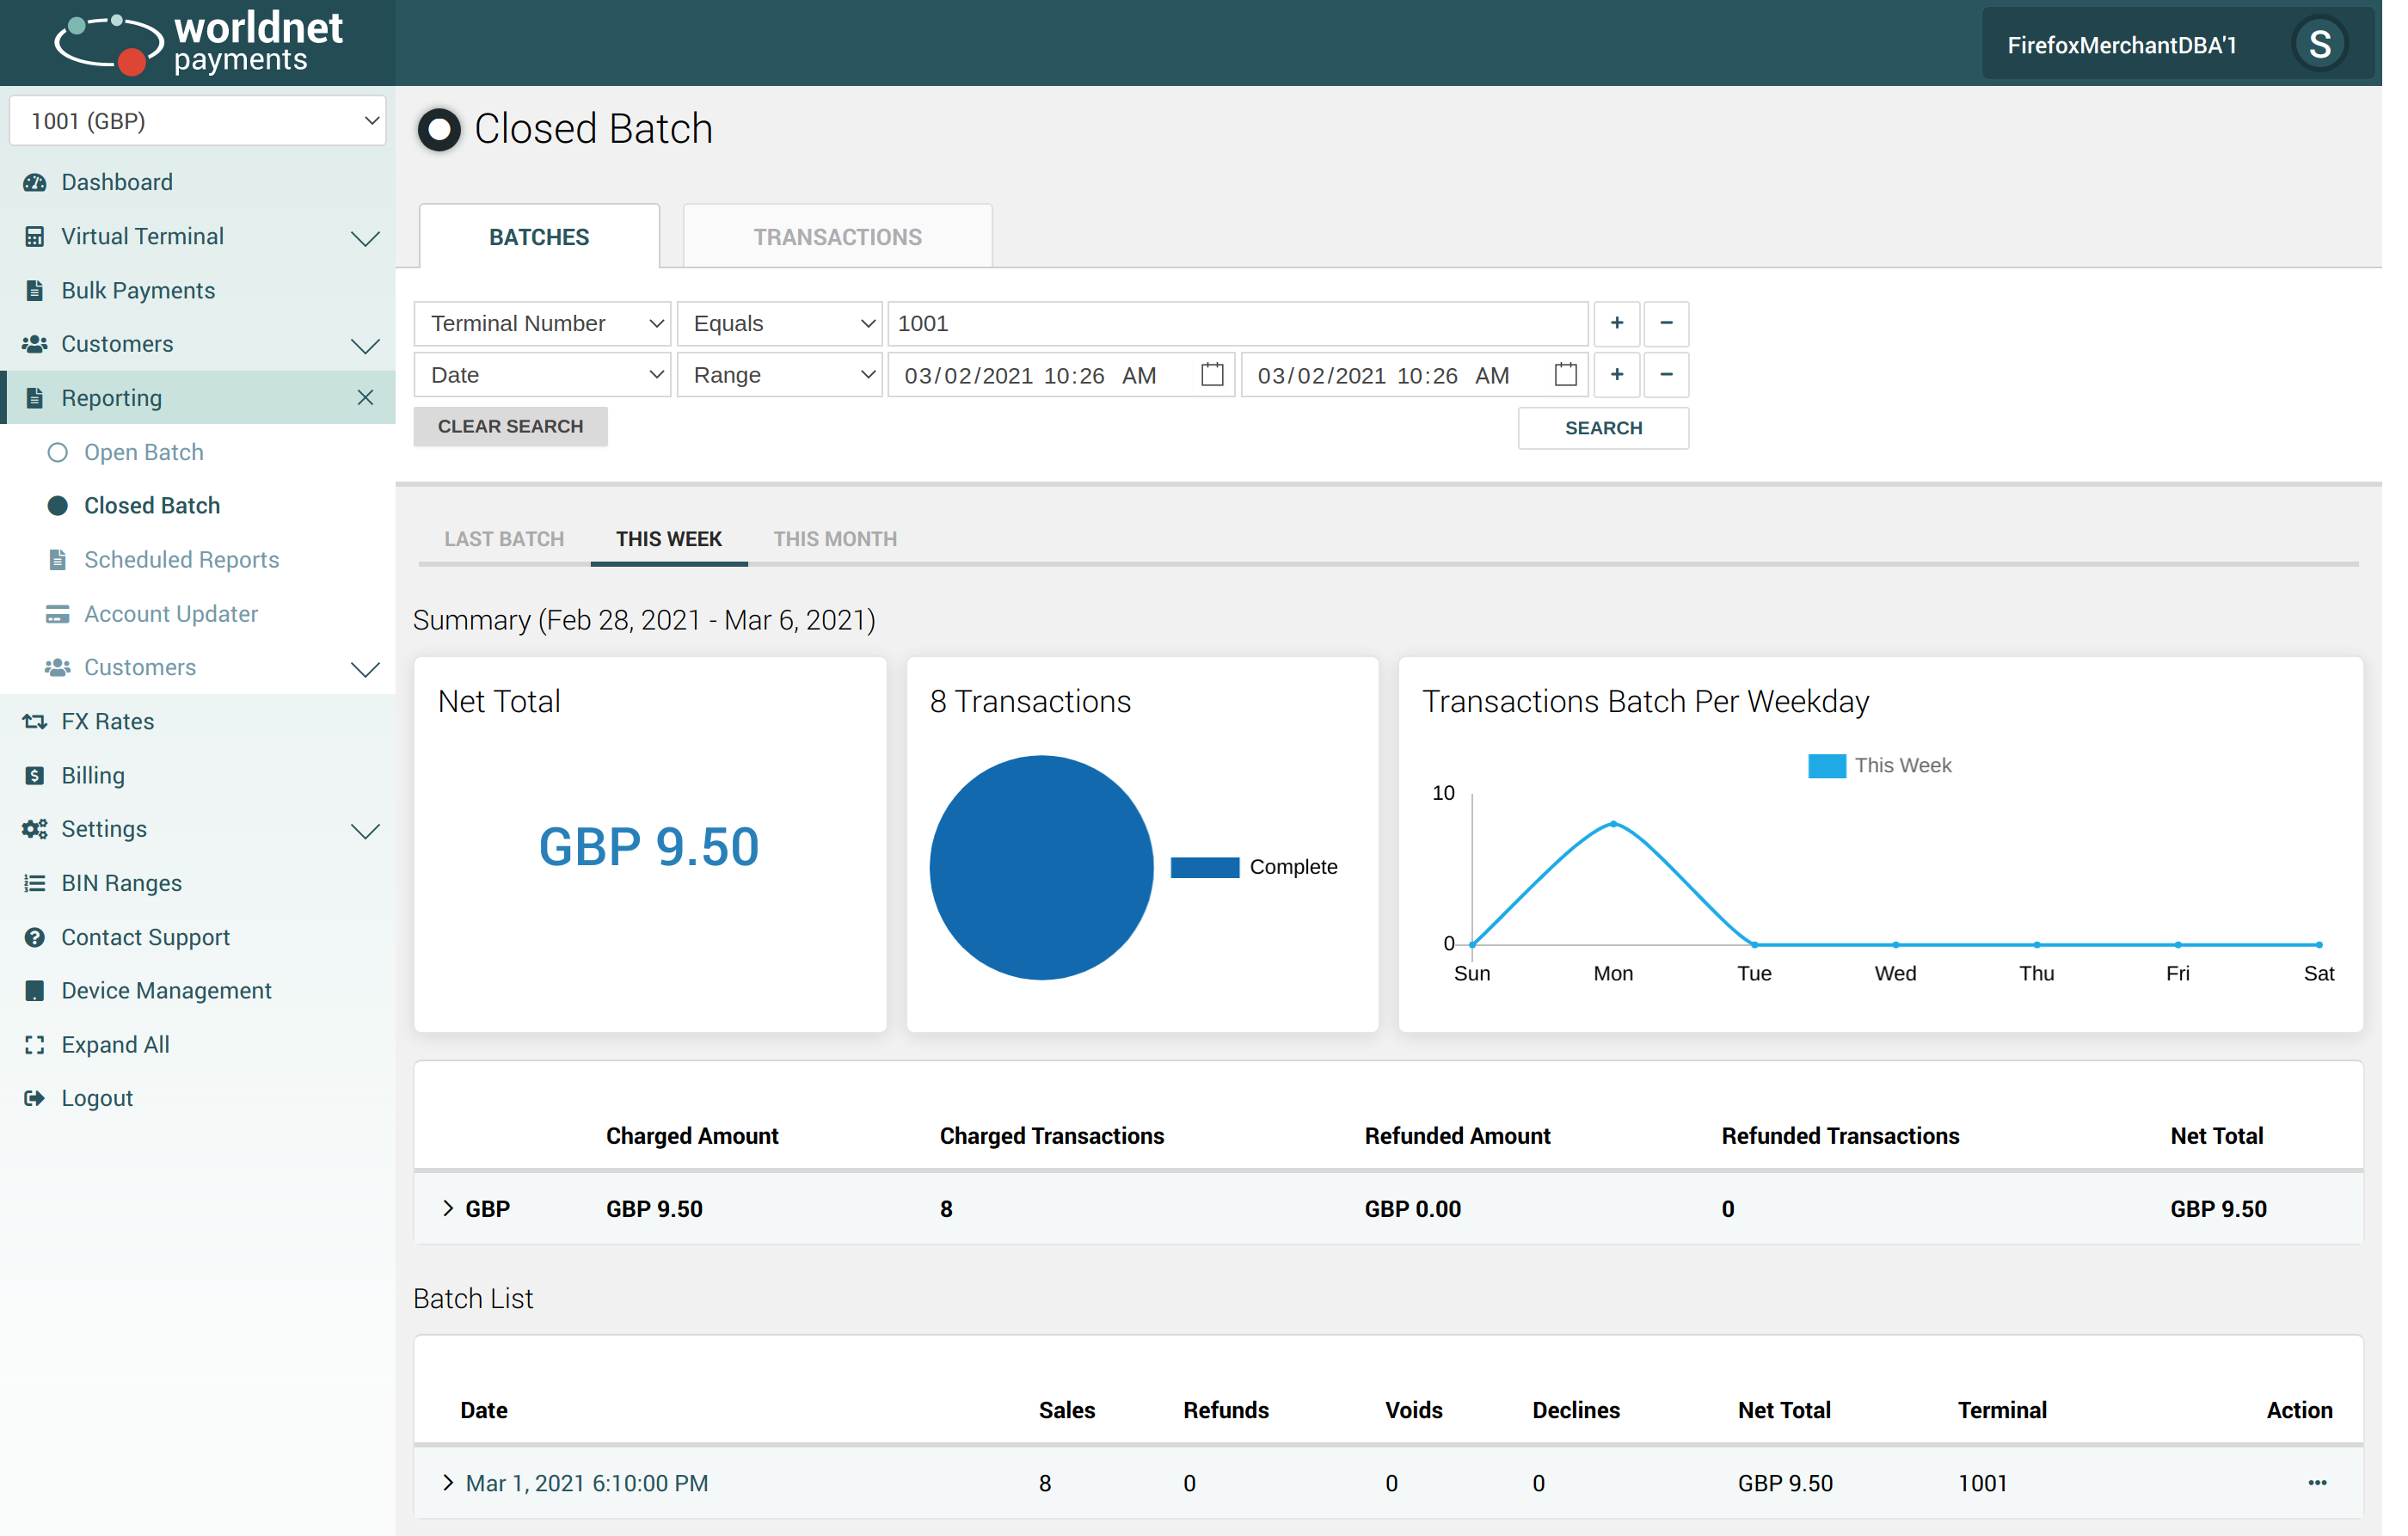
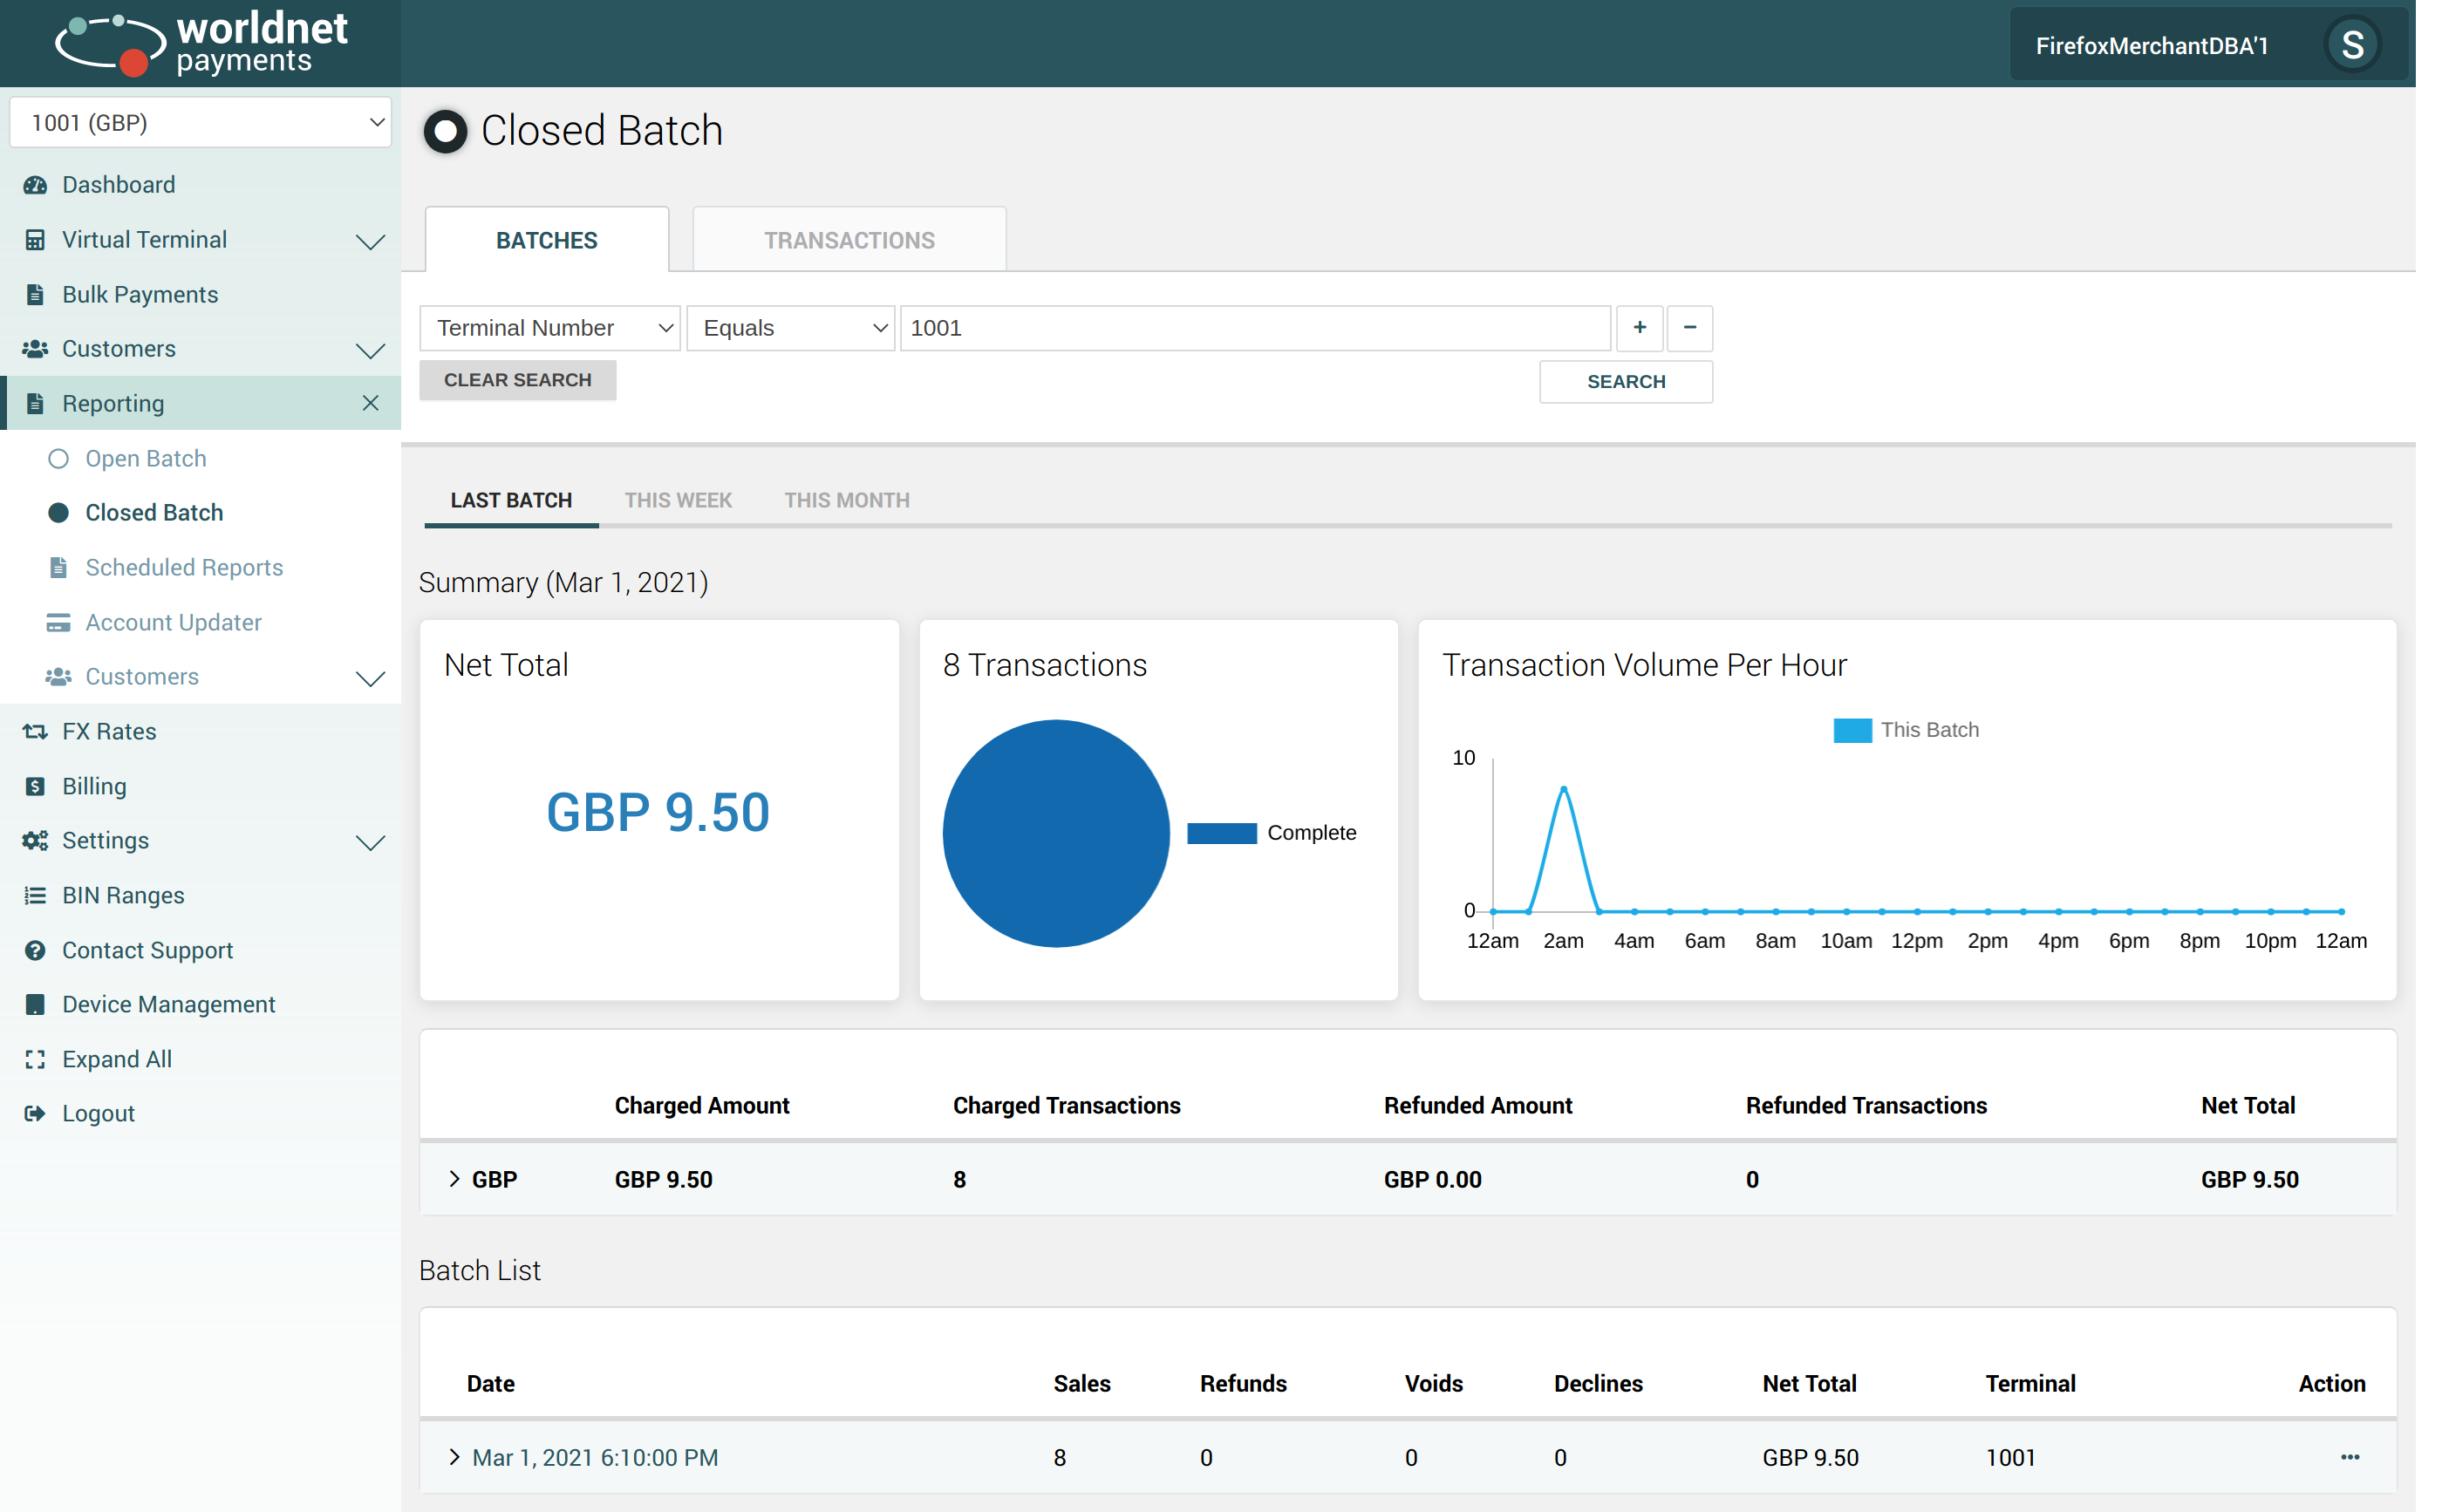
The top of the Batches section will allow you to perform searches to retrieve a particular batch. You can search for a batch on a single terminal or multiple terminals. Search for a specific date or a date range. If your search has any matches, a table will deploy all the results available.
In the graph section, the top menu will provide a summary of the settled transactions for different periods:
- Last Batch - Provides details of the latest settled batch.
- This Week - Provides details about batches settled within the current week.
- This Month - Provides details about batches settled in the current month.
The first graph for single currency terminals is Net Total, with the total amount settled in the time frame selected. For multicurrency terminals, the Net Total is displayed in a bar chart indicating the volume of transactions separated by currency; on mouse-over an information bubble will show the total amount for each currency.
The second graph is a pie chart with information about the transactions’ status within the timeframe selected.
The third graph will indicate the transaction volume per hour, weekday, or day depending on the time frame selected. This data can be used for tracking the impact of marketing efforts, sales events, email campaigns, etc.
The next section contains a list with a breakdown of transactions per currency with Charged Amount, Charged Transactions, Refunded Amount, Refunded Transactions, and Net Total details. Clicking on the arrow to the left will break down the transactions for each currency per card brand (only card brands with transactions will display here).

Below the currency breakdown, we find the Batch List of the period range selected (Last Batch, This Week, This Month). This is a list of all batches included in that period range. Clicking on the date will show all transactions included in that particular batch. On the right side, an action menu will appear when the user clicks on the dots [∙∙∙] menu. Three different actions will be presented:

- View Batch Transactions: Displays all transactions within that batch. The user can use this or click on the date / time link in the table.
- View Batch Summary: Displays a summary of that batch with a detailed graph and a breakdown of transactions divided by currency.
- Export as CSV: Will export all transactions to a CSV file format.
The first 2 items will be explored in the Batch Transactions and Batch Summary sections below.
Transactions Tab
![]()
For the Transactions section, you can locate a transaction using multiple criteria:
- Terminal ID
- Order ID
- Unique Ref
- Card Number (First 6 and Last 4 digits)
- Transaction Date
- Cardholder Name
- Amount
- Retrieval Number
Additional search criteria can be added as needed. If the search criteria results in a large amount of data, you will need to narrow your search or utilize Scheduled Reports to retrieve the data. A notification is displayed if you hit the limit on the amount of data that can be retrieved when using the search feature in Closed Batch.
Schedule Reports can be found under the Reporting Menu in Selfcare.![]()
If any transaction matches the query, the system will display them in the table. Clicking on the left arrow will open additional information about the transaction. The line to the left of the transaction will change colors based on the status of that transaction. Green means the transaction was COMPLETE, yellow means PENDING, red means DECLINED, and gray for any other response. Clicking on Order ID will display the transaction details panel.
You can quickly perform actions on the transactions listed by clicks on the dots [∙∙∙] menu.- View the transaction details
- Refund the transaction
- View Sentinel Defend Events (if enabled for your terminal)
- Resend the cardholder receipt
- Print Receipt
- Create a Secure Token or Subscription
- Transaction Details, to view additional information about a transaction.
![]()
- Refund, this allows the user to perform a quick refund. The Refund Panel will display details about the transaction and will ask the user the amount and the reason for the refund to be performed.

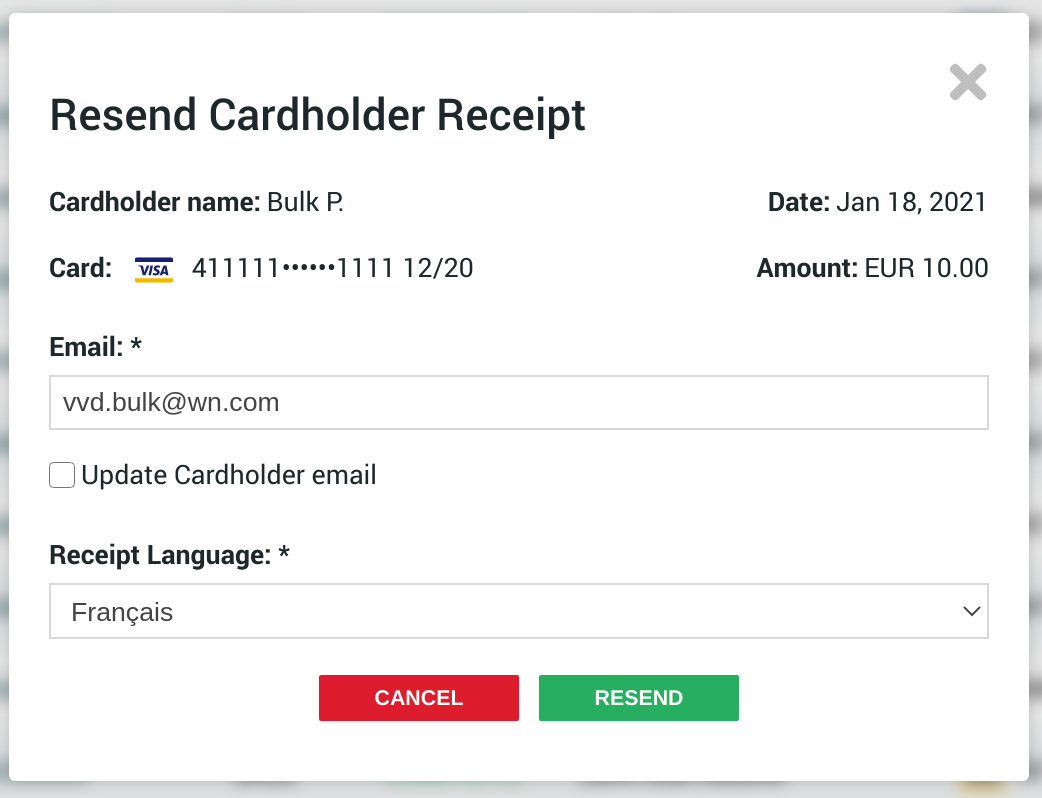
- Resend Cardholder Receipt, this will open a panel with an input field asking for an E-mail address. The user can click on the Update Cardholder email checkbox to update the email address used during the transaction. Also, in multi-language terminals, it will ask for a Receipt Language.
- Print Receipt, this will open a panel where the user can select different languages (if available) and two buttons indicating if the user requires a Merchant Copy or a Cardholder Copy.

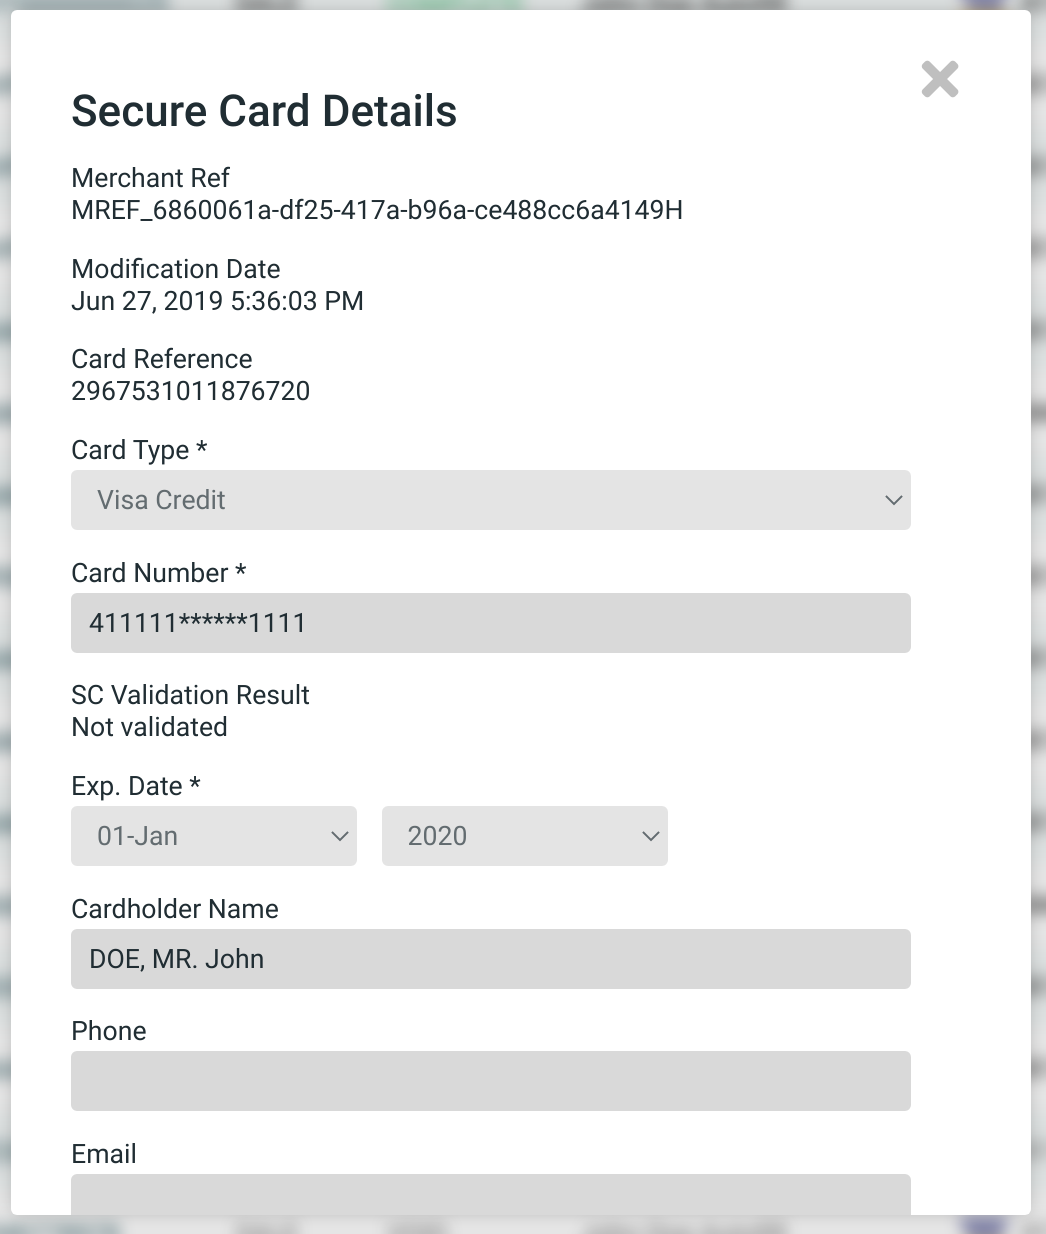
- Create Secure Token: This allows the user to create a Secure Token using the same card used to perform the transaction. This is a handy option to create Subscriptions or additional sales using the same card in the future. This is enabled only in certain terminals. If you require this feature, please contact your vendor.
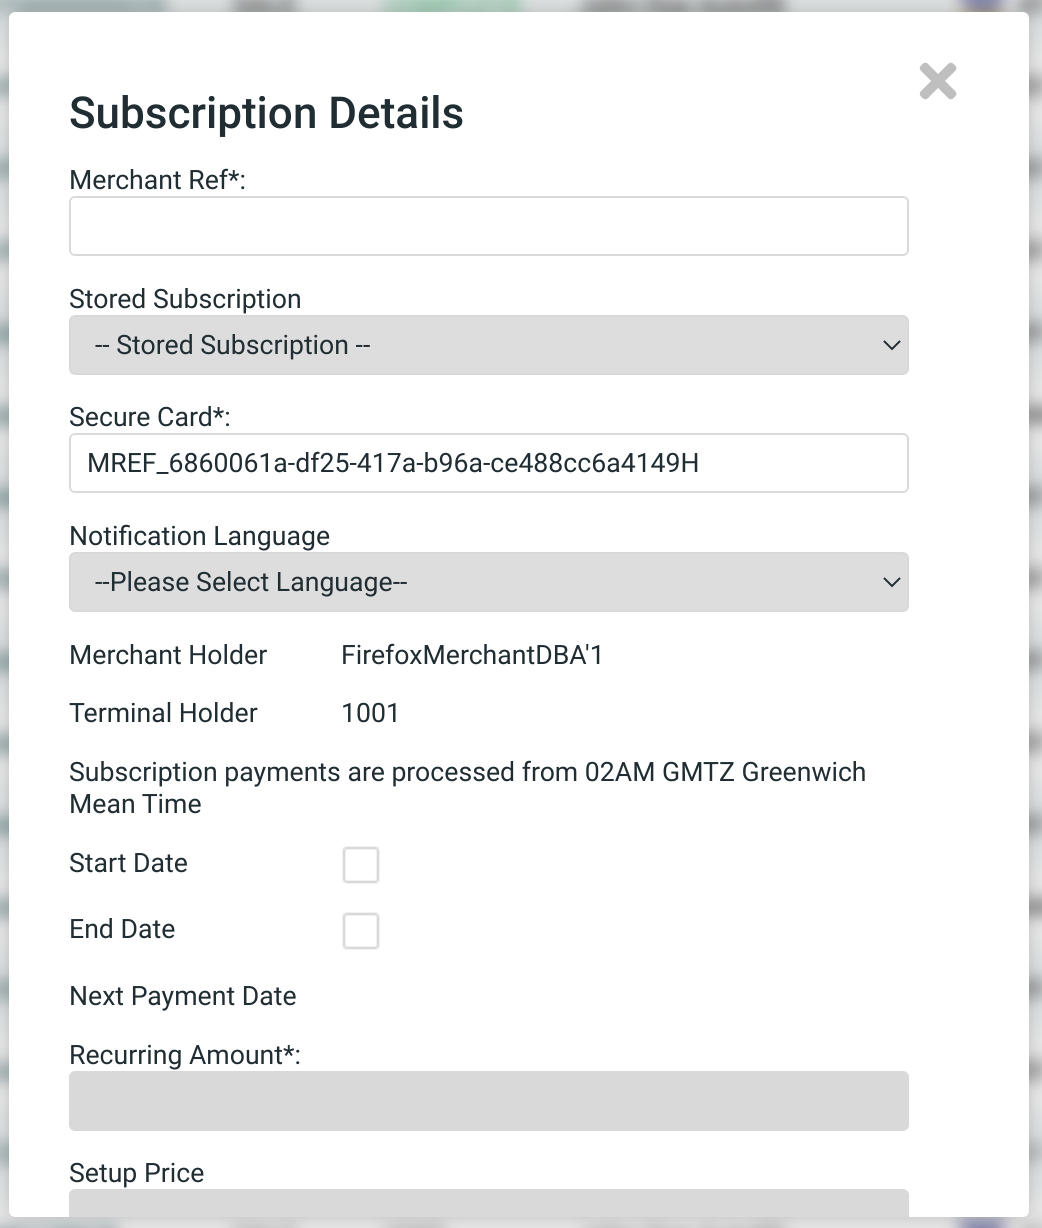
- Create Subscription, after creating a Secure Token, the user can create a Subscription directly on Closed Batch. There is the option to change the Notification Language and to set a specific start and end date.
Batch Summary
The Batch Summary will display information about the selected batch. It has the same details as the grouped batch summary covered in the Batches section.
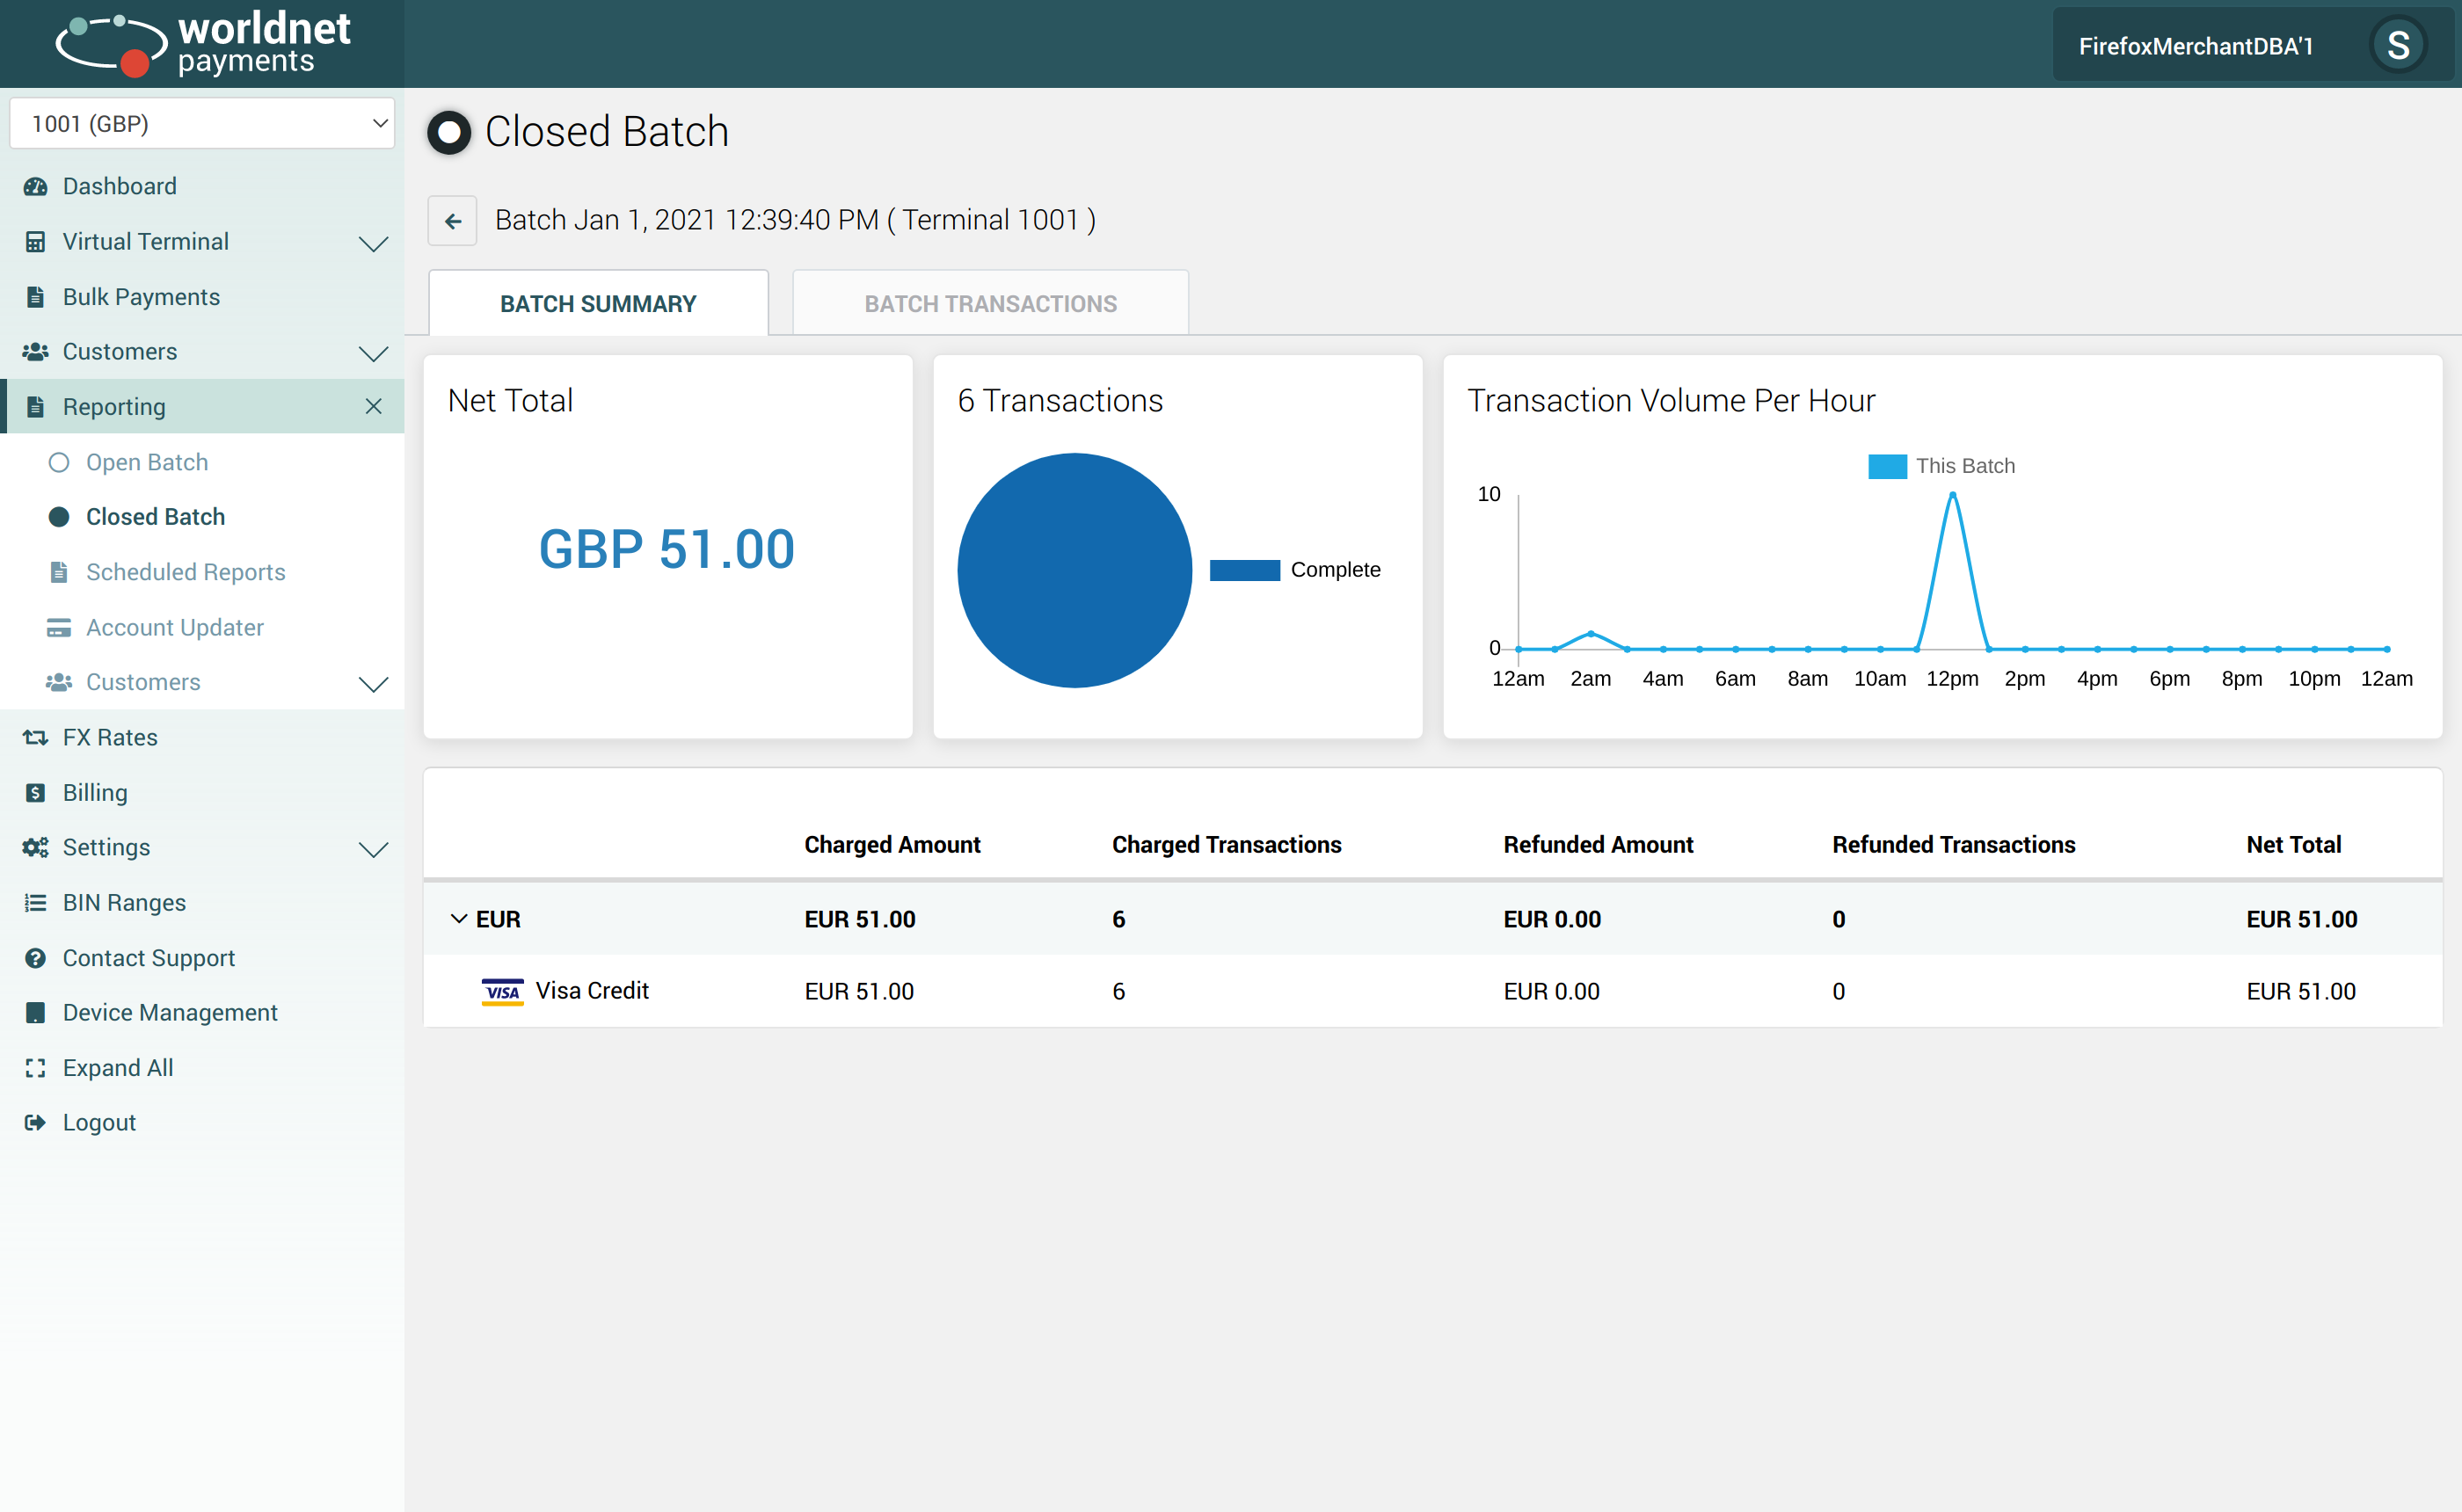
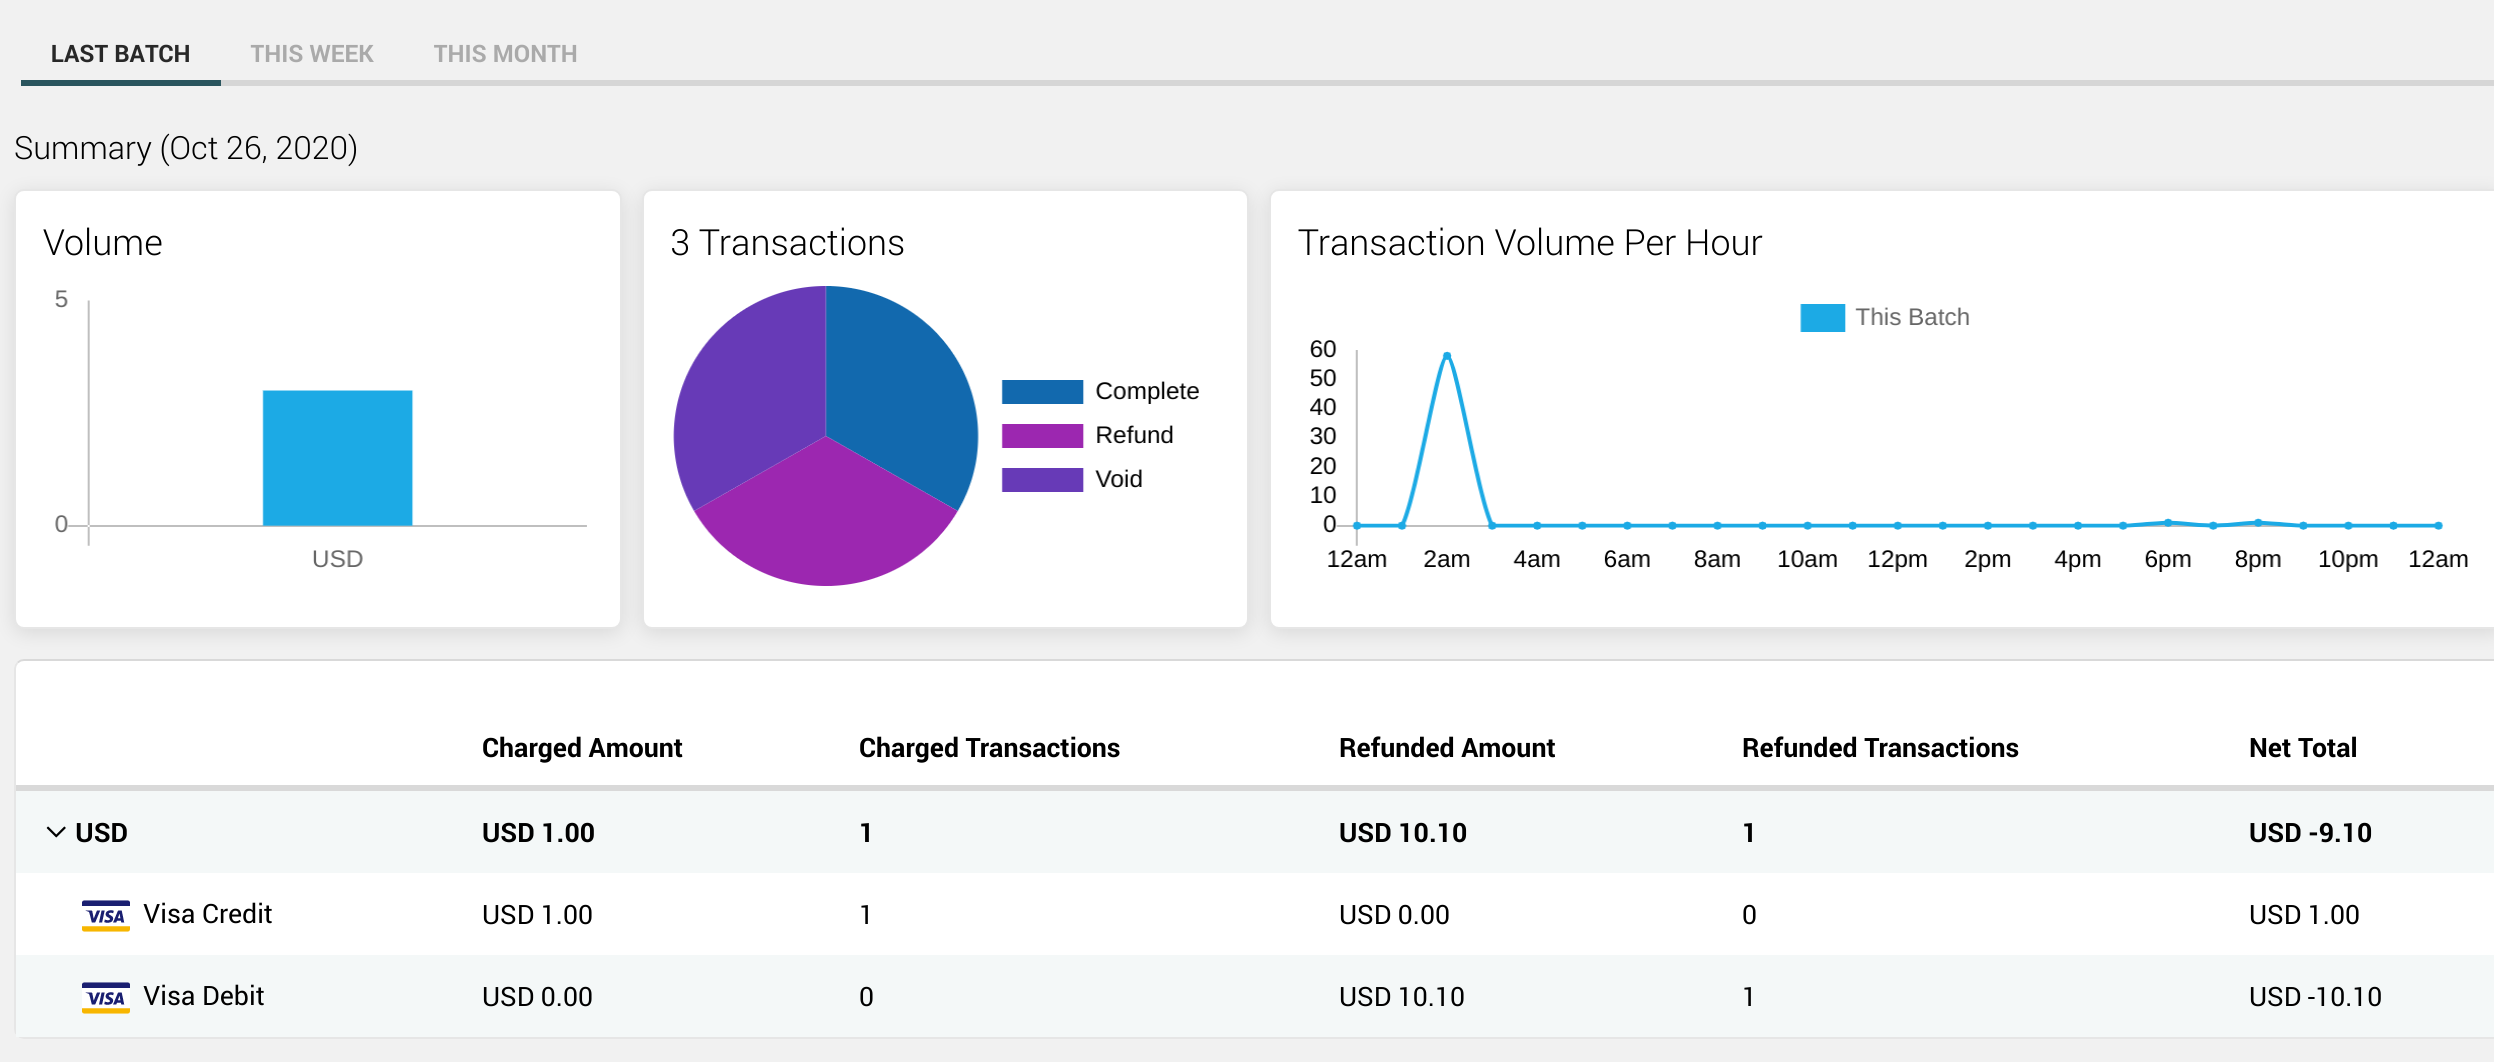
The first graph for single currency terminals is Net Total, with the total amount settled in the batch selected. For multicurrency terminals, the Net Total is displayed in a bar chart indicating the volume of transactions separated by currency, on mouse over an information bubble will display the total amount for each currency.
The second graph is a pie chart with information about the statuses of the transactions for the selected batch.
The third graph is the volume of transactions per hour.
Below the graphs, there is a table with a breakdown of transactions per currency with details about Charged Amount, Charged Transactions, Refunded Amount, Refunded Transactions and Net Total. Clicking on the arrow to the left, will break down the transactions for each currency per card brand (only card brands with transactions will display here).
Batch Transactions
![]()
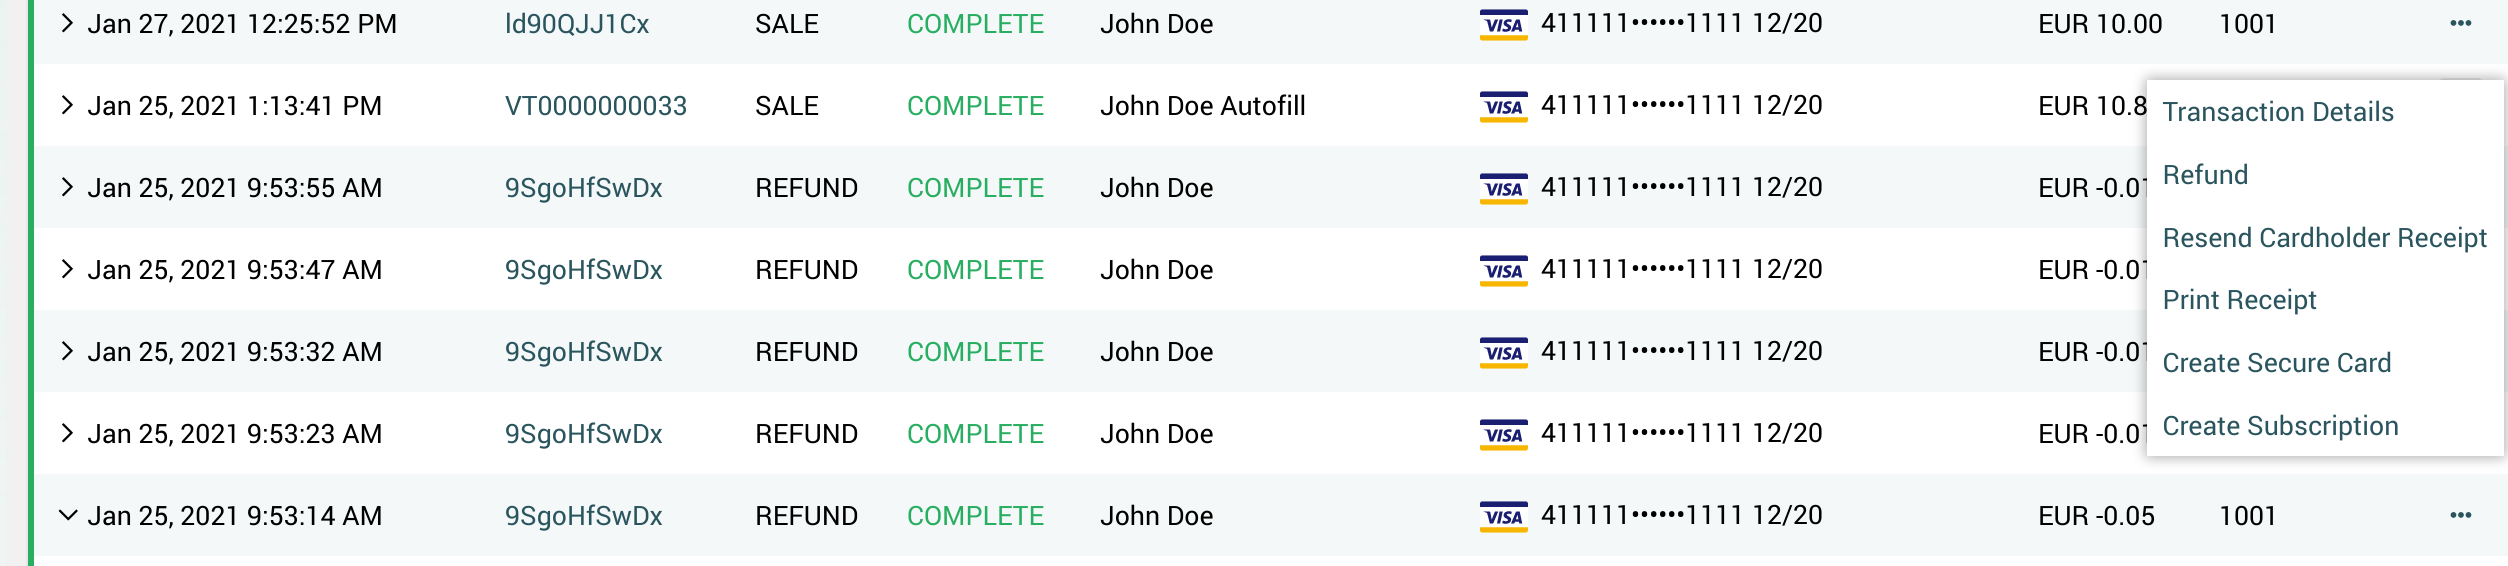
In the Batch Transactions section you can search for a specific transaction within a batch. It also allows the use of Custom Fields in the search queries. The left bar indicates the status of that transaction and the arrow at the left displays further information about the transaction. Clicking on the Order ID will bring the transaction details.
For each transaction available on screen, there are a number of actions available. The Actions Menu will appear when the user clicks on the dots [∙∙∙] menu.
Transaction Details, to view additional information about a transaction.
![]()
Refund, this allows the user to perform a quick refund. The Refund Panel will display details about the transaction and will ask the user the amount and the reason for the refund to be performed.
Resend Cardholder Receipt, this will open a panel with an input field asking for an E-mail address. The user can click on the Update Cardholder email checkbox to update the email address used during the transaction. Also in multi language terminals, it will ask for a Receipt Language.

Print Receipt, this will open a panel where the user can select different languages (if available) and two buttons indicating if the user requires a Merchant Copy or a Cardholder Copy.
Create Secure Token, this option allows the user to create a Secure Token using the same card used to perform the transaction. This is a handy option to create Subscriptions or additional sales using the same card in the future. This is enabled only in certain terminals. If you require this feature, please contact your vendor.
Create Subscription, after creating a Secure Token, the user can create a Subscription directly on Closed Batch. There is the option to change the Notification Language and to set an specific start and end date.
