How To Do
Change Shared Secret
To set up a new Shared Secret or to change an existing one, you need to:
- Go to Terminal under “Settings” Menu.
- Find two fields called “Secret” and “Confirm Secret”.
- Enter your new Shared Secret into both fields (those 2 strings must be identical).
- Accept changes by clicking on “Update Settings” at the bottom of the page.
- Finally, please confirm that you are sure you want to change the Shared Secret.
The Shared Secret is used to validate the details of any incoming transactions to the system. If it is changed then ALL websites/devices using the old Shared Secret for this Terminal ID will also have to be updated with the new one, or they will be unable to transact.
Create a New user
Adding a new user is very simple and quick in the SelfCare and it takes only a few following steps:
- Go to “Users” section under “Settings” menu.
- At the bottom of the Users list click “New User”.
- Enter Username (this will be case sensitive); new user’s email address and YOUR current password (this is for security purposes to ensure that you have the permission to create new users).
- Now choose a Default Terminal for the new user (by default it is always your first terminal but you can change it to any terminal if you have multiple terminals on your account).
- Assign Users Permissions by clicking on More Settings (permissions can be added or removed from the user's account at any time after the user is created).
- Click on “Add” to create a new user.
When you create a new user, the log-in details are automatically emailed to them directly from the system. Two separate mails are sent (for security reasons) containing full instructions about how to set their initial password and log in.
Find Terminal ID
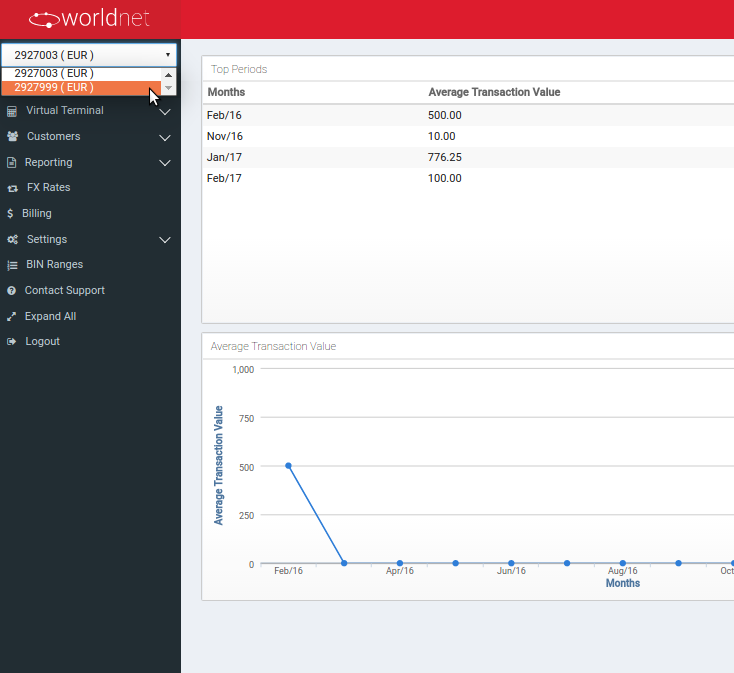
A Terminal ID (or TID) for your account can be found at the top-left corner of the SelfCare, just underneath the Worldnet logo.
If there is more than one terminal assigned to your account, this will be a drop-down list with all your active terminals and their currencies. You can switch between your terminals using this menu, and the currently active terminal will be highlighted.
This is the example of a list with active Terminal IDs:
Refund Transaction
Refunding a transaction is very simple in the SelfCare. It only takes the following steps:
- Find the original transaction in the Open Batch or Closed Batch section of our SelfCare. You can use one of filters to find a transaction or click on a batch date stamp to open transactions if you know the exact date of the transaction.
- Click on a time stamp of a transaction you want to refund to see the full details and there is a “Refund” button at the bottom of the page.
- Click on the Refund button and fill both new fields: Amount and Reason. By default, you can refund up to 100% of the original transaction value (this is called the max refund percentage and it can be changed as needed by contacting Worldnet Support).
- Click “Submit” button to confirm the refund.
For safety reasons, there is an additional approval box and you need to confirm that you wish to proceed with the refund. Please note that once the refund is confirmed, it cannot be reversed. However, you still will be able to void it, if necessary.
Also note that the system keeps track of all refunds for a transaction and the sum total cannot exceed the max refund percentage of the original transaction value. If the operator doesn't realise that they have already refunded the transaction, then this can lead to an error message that says “Invalid Refund Amount. Your refund amount must be a number and not greater than…”
Process Sale with Virtual Terminal
Processing sales transactions using Virtual Terminal is very simple and takes only a couple of seconds. To process any transaction you need to:
- Firstly, ensure that you are using the correct Terminal ID. Terminal ID is displayed in the right top corner of the SelfCare, just beside Logout button.
- Then go to “Sale” section under Virtual Terminal menu.
- Complete all the fields including drop-down lists for Card Type and Expiry Date.
- Ensure all details are correct and then click on “Perform Sale” button at the bottom of the form.
Please note that:
- If you have Auto Order ID enabled on your Terminal then the Order ID field is automatically filled with a sub-sequential number for your next order. Otherwise, you need to enter a unique Order ID for each transaction.
- For “Amount” field please use only digits and a dot if you require decimals. No currency symbol is required.
Once the transaction has been processed, your receipt will be displayed. This can be printed (by clicking on “Print” at the bottom of the Receipt), if necessary.
The transaction can be viewed in the Open Batch now.
Reset Password
In case you do not remember your password or would like to change it, you need to use “Forgot Password” option in the main Login screen. When you click on this, a new form will be displayed and you need to enter:
- 4-digits Worldnet Merchant ID.
- Your unique Username.
- eMail address registered for your user account.
- Click on “Request Password Reset”.
If all details match your user account details, an email will be sent to your registered email address. This email contains a link that you need to follow to reset your password.
Please note:
- Unfortunately, we do not have access to your password and we cannot reset it for you.
- We never send passwords by email or provide by phone.
- We will never ask you for your personal password.
Void Transaction
A Void is the cancellation of a previous sale that has not yet been settled/batched. A void can only be performed on transactions in the Open Batch. The original sale transaction is effectively removed from the batch of transactions to be settled, but will still appear with a status of “Void”. Once a transaction has been voided this action cannot be undone.
Note: Worldnet do not handle any actual funds and have no control over this process. Please contact your merchant bank for any further information.